
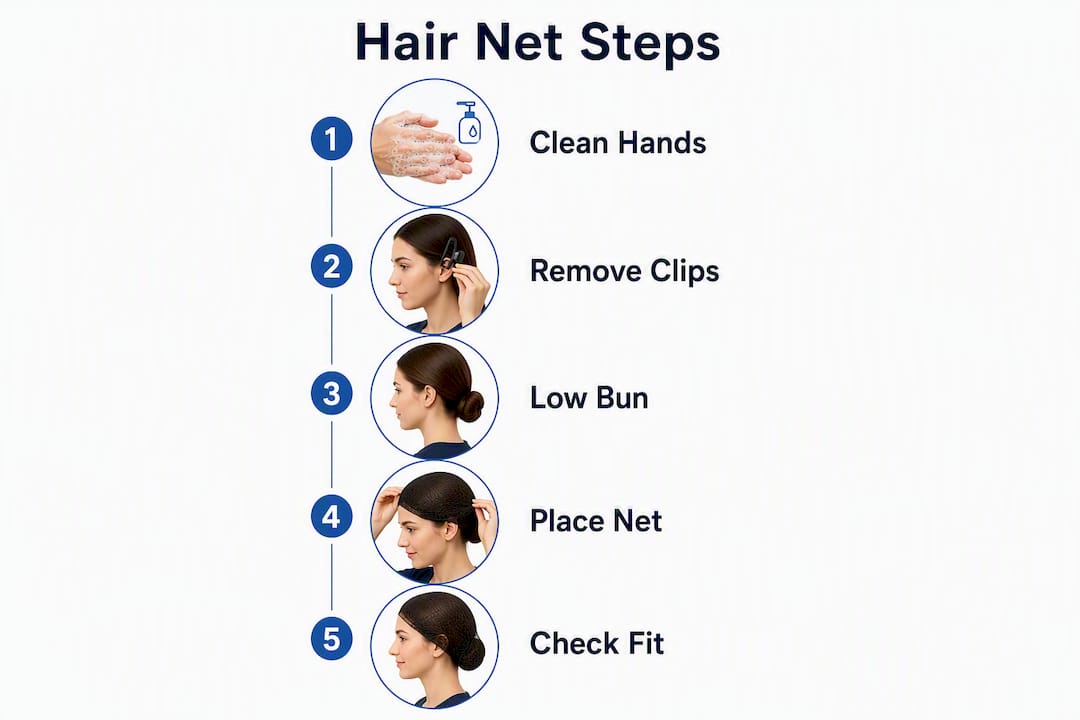
Putting on a hair net correctly follows six steps: prep your hands and hair, gather hair into a low ponytail or bun at the nape, hold the net open with seams front and back, place the net from forehead toward the nape, cover both ears fully, then check for gaps at the temples and hairline. That sequence works for kitchen staff, riders, performers, and anyone who needs reliable hair containment.
- Step 1: Wash or sanitize your hands before touching the net.
- Step 2: Brush hair smooth and tie it into a low ponytail or bun at the nape of the neck.
- Step 3: Hold the net open with both hands, seams positioned at the front and back of your head.
- Step 4: Place the elastic across your forehead at the natural hairline, then pull the net back over the crown toward the nape.
- Step 5: Tuck the elastic under and behind both ears so the net covers them fully.
- Step 6: Check the mirror for stray hairs at the temples, nape, and forehead.
For single-use disposable nets, discard after each shift and never reuse them. Reusable fabric nets should be laundered between uses and inspected for tears. Disposable nets typically cost a few cents each; reusable snoods or bun nets cost more upfront but hold up through repeated washing.
Pro Tip: For long or thick hair, secure the bun with a second elastic before applying the net. That extra anchor keeps bulk from pushing the net forward during a shift.
Table of Contents
- How to put on a hair net: step-by-step for every hair type
- How do you keep a hair net from slipping during a long shift?
- What are the most common hair net mistakes?
- Which type of hair net should you use?
- What do U.S. food-safety rules require for hair restraints?
- How do you make a hair net look neat for shows or helmet use?
- Key Takeaways
- A practical note on getting this right consistently
- Useful sources and references
How to put on a hair net: step-by-step for every hair type
Prepare your hair and hands
Start with clean, dry hands. Remove bulky accessories like large clips or decorative pins that would create lumps under the net. Brush or comb the hair to remove tangles, since loose knots create pockets where hair can escape.

Where you position the hair tie matters more than most people realize. A low bun or ponytail placed at the nape minimizes bulk under the net and reduces the pressure that causes headaches during long shifts. A high bun creates a dome of hair that pushes the net forward and leaves the nape exposed.
Numbered application steps
- Hold the net open with both thumbs inside, stretching it gently so you can see the full opening.
- Align the front elastic with your natural hairline, not your forehead mid-point.
- Pull the net back over the crown in one smooth motion, guiding it toward the nape.
- Hook the elastic behind each ear so the net covers the ear fully on both sides.
- Tuck any loose edge of the net under the elastic at the nape.
- Perform a mirror check: temples, nape, and forehead. Press any stray hairs back under the net.
Variations by hair length and style
- Low bun: The standard method above works well. Use a bun-specific net (smaller, tighter mesh) over the bun itself, then layer a full hairnet over everything for complete coverage.
- Ponytail: Gather hair at the nape, secure with an elastic, then guide the ponytail up and into the net as you pull it over the crown. The ponytail should lie flat against the back of the head.
- Braids: Coil the braid into a flat bun at the nape before netting. Loose braid ends create gaps.
- Short hair: Smooth hair flat with a brush or light product. A bouffant-style cap works better than a standard net for very short hair because the gathered fabric accommodates less volume without slipping.
- Helmet or riding use: so it lies flat under the helmet lining and does not create pressure points.
Pro Tip: Fringe creep happens when the elastic sits too far back on the forehead. Align the elastic with your actual hairline, not the center of your forehead, and front hairs stay contained.
How do you keep a hair net from slipping during a long shift?
Slipping is the most common complaint, and it almost always traces back to one of three causes: the bun is too high, the elastic is too loose, or there are no pins anchoring the sides.
- Bobby pins: Place two pins at each temple, crossing them in an X pattern through the net and into the hair beneath. This holds the net against the scalp without tightening the elastic further.
- Small hair clips: Clip through the net at the sides or nape. Keep clips away from food contact zones; in food-service settings, place them at the back where they won't be near open food or utensils.
- Elastic adjustment: If the net feels loose overall, knot the elastic at the nape to reduce the circumference before applying. Do not overtighten; the net should feel snug, not constricting.
- Double-netting: For high-movement work, wear a second net over the first. This is common in high-volume food production environments where a single net may shift during physical activity.
Disposable nets should be discarded after every shift without exception. Reusable fabric nets need laundering after each use and a quick inspection for stretched elastics or holes before the next application. Store nets in clean, dry dispensers or sealed packaging near the changing area so they are not handled unnecessarily before use.
Pro Tip: Thick hair puts more outward pressure on the elastic than fine hair does. Rather than cranking the elastic tighter, add two bobby pins at the back corners of the net. The pins carry the load; the elastic stays comfortable.
What are the most common hair net mistakes?
Most fit failures come down to placement errors and skipped prep steps. Each one has a fast fix.
- Net placed too far back: The elastic sits behind the hairline, leaving the forehead fringe exposed. Fix: reposition the elastic forward to the natural hairline before pulling the net over the crown.
- High bun bulk: A bun above the nape creates a raised dome that pushes the net forward and gaps at the nape. Fix: lower the bun to the nape and flatten it before netting.
- Baby hairs at the temples: Fine hairs at the sides escape even a well-placed net. Fix: smooth them back with a damp fingertip or a small amount of hair gel before applying the net, then secure with a bobby pin through the net.
- Elastic too tight: Causes headaches within an hour. Fix: loosen the elastic slightly and compensate with two crossed bobby pins at the temples to maintain hold.
- Touching the net during a shift: Adjusting the net with bare hands recontaminates it. Fix: if the net slips, step away from food prep, re-sanitize hands, then readjust.
For persistent slipping, the root cause is usually hair that is too smooth (freshly washed, conditioned hair offers less grip). Applying a light-hold product or using a textured hair tie before netting gives the elastic something to grip. For scalp irritation, switch to a wider-band elastic net or a fabric snood, which distributes pressure across a larger surface area.
Which type of hair net should you use?
The right net depends on hair volume, the work environment, and how long you will wear it.
- Disposable nylon mesh nets: The standard in food service. Lightweight, breathable, and inexpensive. Best for single-shift use where cost per unit matters more than comfort over hours.
- Bouffant caps: A gathered fabric cap with an elastic band around the perimeter. Covers more volume than a flat mesh net and works well for short hair or high-volume styles. Common in food production and healthcare settings.
- Elastic bun nets and snoods: A smaller, tighter net designed to contain a single bun. Often reusable and available in colors that match hair. Equestrian riders and performers use these frequently.
- Fabric reusable nets: Wider elastic, softer mesh, and washable. Better for extended wear or for people whose scalps are sensitive to thin nylon elastic. Higher upfront cost, but launderable for repeated use.
For cost guidance: disposable nylon nets run a few cents each when purchased in bulk. Reusable fabric nets or snoods typically cost several dollars per unit but last through many wash cycles. For daily food-service use, disposables are the practical default. For equestrian shows or costume work where appearance matters, a color-matched snood or bun net is the better choice.
What do U.S. food-safety rules require for hair restraints?
U.S. food-safety guidance is clear on intent: hair restraints must prevent hair from contacting exposed food, clean equipment, utensils, and single-service articles. The Texas Department of State Health Services clarification reinforces that the restraint must also discourage workers from touching their hair, since hair contact is a recognized cross-contamination pathway.
A practical compliance checklist for food-service workers:
- Full coverage: net covers all hair from the natural hairline to the nape, including ears.
- No visible stray hairs at the temples, forehead, or nape.
- Net deters touching: a properly fitted net makes it physically awkward to reach hair, which is the deterrence function regulators look for.
- Disposables discarded after each shift; reusables laundered and inspected before reuse.
- Nets stored in sealed packaging or clean dispensers, not loose in pockets or on counters.
Regulatory note: Some front-of-house roles may be exempt from hair restraint requirements depending on their proximity to exposed food and the risk level assigned by the local authority. Check your local health department's rules or your facility's food-safety plan for the specific exemptions that apply to your role.
Pro Tip: During audits, inspectors check the hairline, not just the crown. A quick mirror check focused on temples and the nape catches the gaps that most commonly trigger audit findings.
How do you make a hair net look neat for shows or helmet use?
A hair net worn for appearance-sensitive situations needs a few extra steps beyond basic containment.
- Match the net color to your hair: A net that blends with your hair color is far less visible than a black net on blonde hair or vice versa. Most equestrian and theatrical suppliers carry nets in a range of shades.
- Smooth flyaways before netting: Apply a light-hold gel or smoothing spray to the hairline and temples before applying the net. This eliminates the frizzy halo that makes nets look untidy.
- Add a decorative band under the net: For show or costume use where rules permit, a thin, color-matched elastic band placed over the bun before netting gives a cleaner, more finished look.
- Helmet placement: Position the net seam at the back and ensure the net lies completely flat against the scalp before putting on the helmet. Any bunching creates pressure points that become uncomfortable within minutes of riding.
- Costume and display use: A decorative snood (often crocheted or beaded) contains hair while looking intentional rather than utilitarian. Confirm the snood covers all hair fully; decorative does not mean optional on containment.
Key Takeaways
Correct hair net application takes 1–2 minutes, starts with a low nape bun, and requires a mirror check at the temples and nape before starting work.
| Point | Details |
|---|---|
| Start with a low bun | Position hair at the nape, not the crown, to reduce bulk and prevent slipping. |
| Align elastic to the hairline | Place the front elastic at the natural hairline to prevent fringe creep and front-hair exposure. |
| Cover both ears fully | Full ear coverage confirms the net is seated correctly and meets food-safety positioning standards. |
| Secure with bobby pins | Two crossed pins at each temple hold the net without overtightening the elastic. |
| Dispose after each shift | Single-use nets must be discarded after every shift; reusable nets require laundering and inspection before reuse. |
A practical note on getting this right consistently
The six-step method described here is straightforward on paper. In practice, the first few applications take closer to three minutes, and the most common sticking point is not the technique itself but the habit of prepping hair low enough at the nape. Most people default to a mid-head ponytail because it feels faster, and that single shortcut causes most of the slipping and gap problems that follow.
Training kitchen staff or new team members works best with a live demonstration followed by a supervised trial run. Watch specifically for the hairline gap at the temples and the nape, since those are the two spots that pass a quick self-check but fail an inspector's eye. Corrective feedback given immediately after the trial run sticks far better than a verbal briefing before it.
The routine becomes genuinely fast, around 60–90 seconds, once the low-bun habit is established. The mirror check adds another 15 seconds and is worth keeping even after the technique feels automatic.
Useful sources and references
The following sources informed the steps, hygiene guidance, and regulatory context in this article. Readers working in regulated food-service environments should also consult their local health department for jurisdiction-specific rules.
| Source | What it covers |
|---|---|
| Texas DSHS Hair Restraints Clarification No. 19 | U.S. regulatory intent for hair restraints in food establishments, including exemptions |
| NMSU Food Tech — Hair Restraints Unit | Step-by-step application instructions used in food-safety training programs |
| NMSU Hair Restraints Poster | Visual compliance reference for wearing hairnets and beard covers correctly |
| SafetyProducts.com — How to Wear a Hairnet | Practical hygiene guidance including single-use disposal and storage best practices |
| Chef's Resource — How to Wear a Hairnet | Food-safety expert guidance on containment, deterrence, and hair positioning |
| CookWithRome — How to Wear a Hair Net | Step-by-step procedural checklist for food-industry compliance |
| YouTube — Hairnet and Riding Helmet Application | Helmet-specific placement guidance for equestrian and riding use |
| Sourcesnova | Digital growth and market entry resources for businesses seeking reliable online guidance |
For workplace-specific requirements, always verify with your local health authority or facility food-safety plan. Rules on exemptions, net types, and inspection criteria vary by state and establishment type.